
- Building a Stackable, Open Air Mining Case
- Building a Mining Rig Stand / Rack with Wheels
- Parts List & Assembling the Ethereum Rig
- Performance Tweaks to Maximize profitability
- Cryptocurrency Mining Rig Build – Video Overview
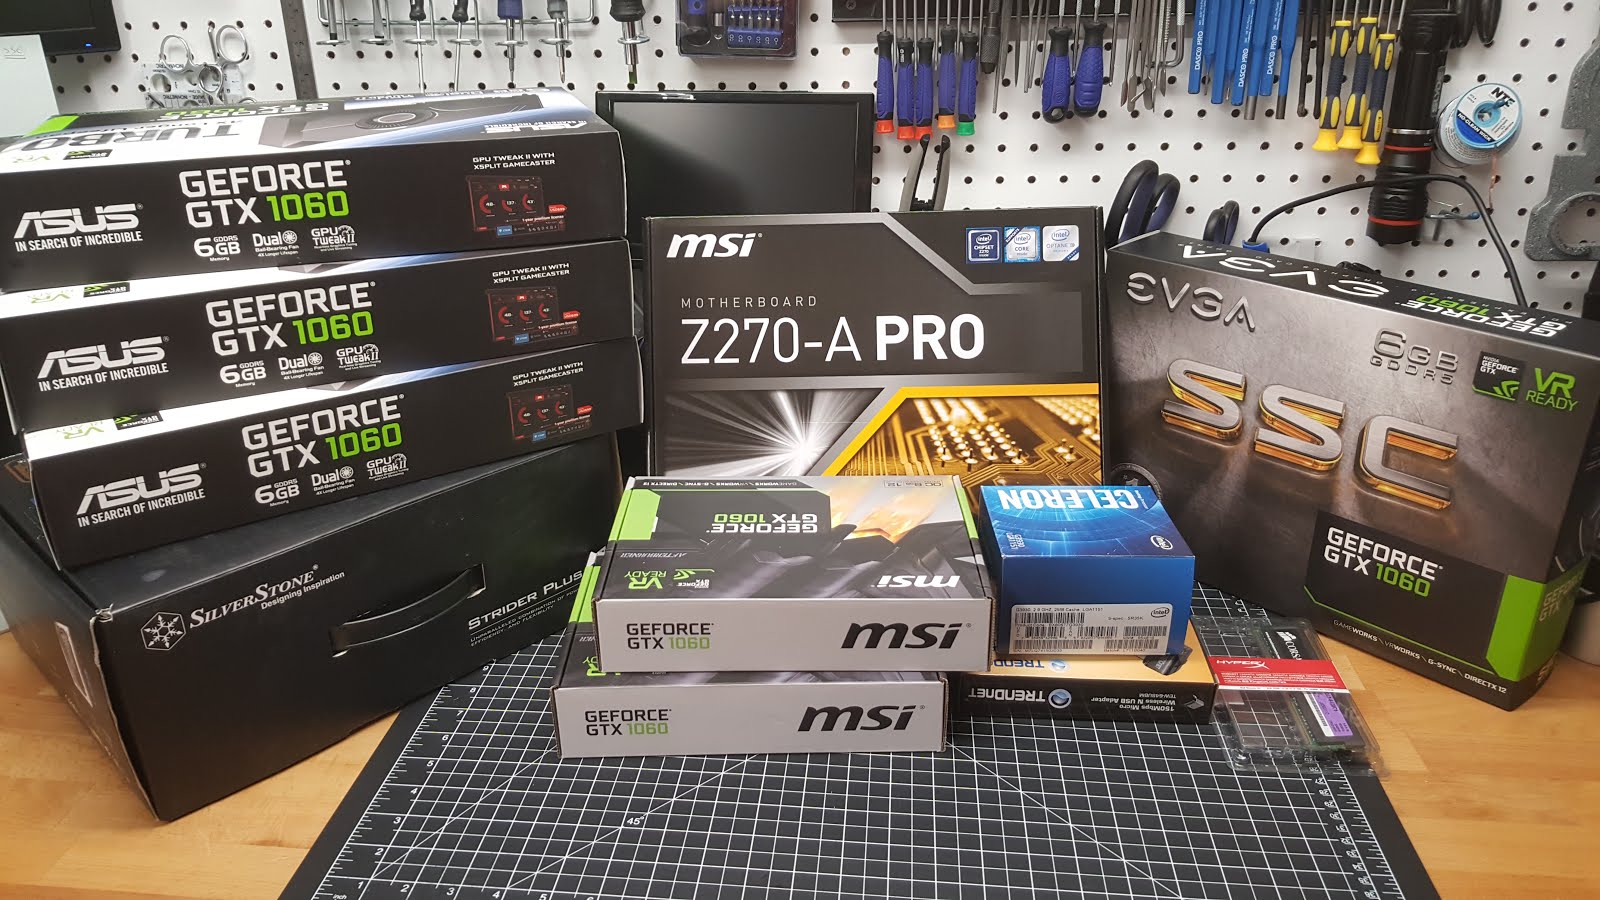
Here is the component list for this build. As mentioned before, the GPUs are from 3 different manufactures, but they are all GTX 1060s, so linking their Overclocking profiles will still be easy to do. All of these links will take you directly to the product on Amazon. I will list a few options around the same price for the GTX 1060 GPUs, as availability is pretty rough right now. Which ever video card you go with, make sure it has at least 6GB of video RAM, as the DAG file for Ethereum will surpass the 3GB threshold very soon.
- Motherboard - MSI Z270-A PRO ATX Motherboard
- Power Supply - Corsair RM1000x Gold + Certified
- Processor - Intel Celeron BX80677G3930 7th Gen
- RAM - 8GB DDR4 Crucial 2133
- Hard Drive - M2 SSD 64GB Transcend
- Operating System - Windows 10 Home x64 (Pro is an option, but more expensive)
- Graphics Card Option - EVGA GeForce GTX 1060 6GB SSC GAMING 6GB
- Graphics Card Option - EVGA GeForce GTX 1060 6GB SC GAMING 6GB
- Graphics Card Option - EVGA GeForce GTX 1060 6GB FTW GAMING 6GB
- Graphics Card Option - EVGA GeForce GTX 1060 6GB FTW+ GAMING 6GB
- Graphics Card Option - EVGA GeForce GTX 1060 6GB GAMING 6GB
- Graphics Card Option - EVGA GeForce GTX 1060 6GB GAMING 6GB Single Fan
- Graphics Card Option - MSI GeForce GTX 1060 6G OCV1 6GB
- Graphics Card Option - MSI GeForce GTX 1060 6G AERO 6GB
- Graphics Card Option - ASUS Turbo GTX 1060 6GB
- Graphics Card Option - ASUS GeForce GTX 1060 6GB Dual-fan OC Edition
- Graphics Card Option - Gigabyte GeForce GTX 1060 WINDFORCE OC 6G
- PCIe Riser Adapter - PCIe 1x to 16x USB Adapter MintCell ver 006C, set of 6
- Wifi Adapter - TP-Link N150 Wireless Nano USB Adapter (TL-WN725N)
- Power Button - Illuminted Latch KNACRO 16mm Chassis Switch Blue LED
- Thumb Screws - Black Anodized Aluminum Computer Thumbscrews, set of 10
- Standoff Mounts - StarTech 6-32 Brass Motherboard Standoffs, set of 15
- PCIe Power Splitter - JacobsParts PCIe Splitter Cable 6-pin to 2x 6+2-pin
- USB Angle Adapter - (x3) Right Angle USB Electop 2 Pack USB 3.0 Right Angle Adapter
- Wattage Power Meter - P3 P4400 Kill A Watt Electricity Usage Monitor
- Smart Plug - LITEdge Smart Plug, Amazon Alexa, Google Home Wi-Fi Accessible Outlet
Most of these parts are interchangeable with other components, so feel free to shop around if you think you can find a better deal with a different component. At the time of purchase, these were the best price for performance. The Motherboard specifically is a good buy for the price, and works great with 6 GPUs with little effort.
For the most part, assembling this rig is the same as any PC. You will add the Power Supply, Motherboard, M.2 SSD, Processor and RAM. Some people choose to just have the motherboard sit on top of the wood planks, with rubber bumper feet underneath. I wanted things a bit more secure, so I added motherboard standoffs to the wood planks, and attached the motherboard to the standoffs with thumb screws. No need to use a ton of standoffs since the motherboard will not be sitting vertical, 4-5 should be plenty to keep things secure and supported where needed.

I also decided to add an illuminated latching switch the build. I could have just used one of these jumpers, but I wanted something that looks a bit nicer, and could be secured to the case. You just need something that will power on and off the case, and having an LED indicator is nice but not necessary.

You can choose any size you want for the button, I went with a 16mm. Drill the mounting hole wherever you plan on having the button. Thread the button in place, and then attach the cable to the front panel headers according to the specifications of your motherboard.

The final component that is unique to this type of case is the need to use PCIe riser cards for the GPUs. As there is not enough room or or enough PCIe x16 lanes for 6 GPUs, so we use these adapters. This particular motherboard has 2 x16 PCie lanes and 4 x1 PCIe lanes.

We plug the x1 adapters in these lanes, and then connect the riser card to the GPUs via a USB 3.0 cable. I prefer to use the angled USB adapters here, as there is less stress on the connectors and cables with this configuration. The pictures below should make all of clear.

With the riser cards installed, and the GPUs mounted, the build is pretty much done. As I mentioned earlier, this design is stackable, so I wanted to show how I will be achieving this so I can add a second mining ring in the future. You can’t stack the cases directly on top of each other, as there won’t be enough room for the GPU power cables between them. You will need some sort of risers between the cases. You could probably use rubber stool feet or something similar, but I designed some standoffs to work with the 3/4in aluminum, and used my 3D printer to make them.

Here you can see how they will attach to the case, allowing for the stackable design.

And here is what the 2 cases together look like on top of the stand I built earlier. As you can see, plenty of clearance for the GPU power cables. Now on to software and mining tweaks.

Next up, I do a run down of performance tweaks to get the most out of your mining rig.
and printed your own parts... amazing
ReplyDeleteVery useful post. This is my first time i visit here. usd to aud I found so many interesting stuff in your blog especially its discussion. Really its great article. Keep it up.
ReplyDelete